| To Animate the [Fantasy Girl Fairy 3D] Shape | ||||||||||||||||||||||||||||||||||||||||||||||||||||||||||||||||||||
Utilizing low poly 3D Character Shape in the CadNav.com for iClone CC Model |
||||||||||||||||||||||||||||||||||||||||||||||||||||||||||||||||||||
|
||||||||||||||||||||||||||||||||||||||||||||||||||||||||||||||||||||
 |
||||||||||||||||||||||||||||||||||||||||||||||||||||||||||||||||||||
|
||||||||||||||||||||||||||||||||||||||||||||||||||||||||||||||||||||
1 |
Target Model Downloading | |||||||||||||||||||||||||||||||||||||||||||||||||||||||||||||||||||
1) |
Go to 3D CadNav.com (Home), go to 3D Models and pick the favorite Model. | |||||||||||||||||||||||||||||||||||||||||||||||||||||||||||||||||||
 |
||||||||||||||||||||||||||||||||||||||||||||||||||||||||||||||||||||
2) |
Select [Fantasy girl fairy 3d model], download, save and unzip the File. | |||||||||||||||||||||||||||||||||||||||||||||||||||||||||||||||||||
|
||||||||||||||||||||||||||||||||||||||||||||||||||||||||||||||||||||
2 |
Understanding the Static Model Data to Prepare for the iClone Use. | |||||||||||||||||||||||||||||||||||||||||||||||||||||||||||||||||||
1) |
Open 3ds Max, Load the Cadnav.com_A1121304.max. (changed to FantasyGirl.max) | |||||||||||||||||||||||||||||||||||||||||||||||||||||||||||||||||||
 |
||||||||||||||||||||||||||||||||||||||||||||||||||||||||||||||||||||
2) |
Export the Model data by FBX format. | |||||||||||||||||||||||||||||||||||||||||||||||||||||||||||||||||||
3) |
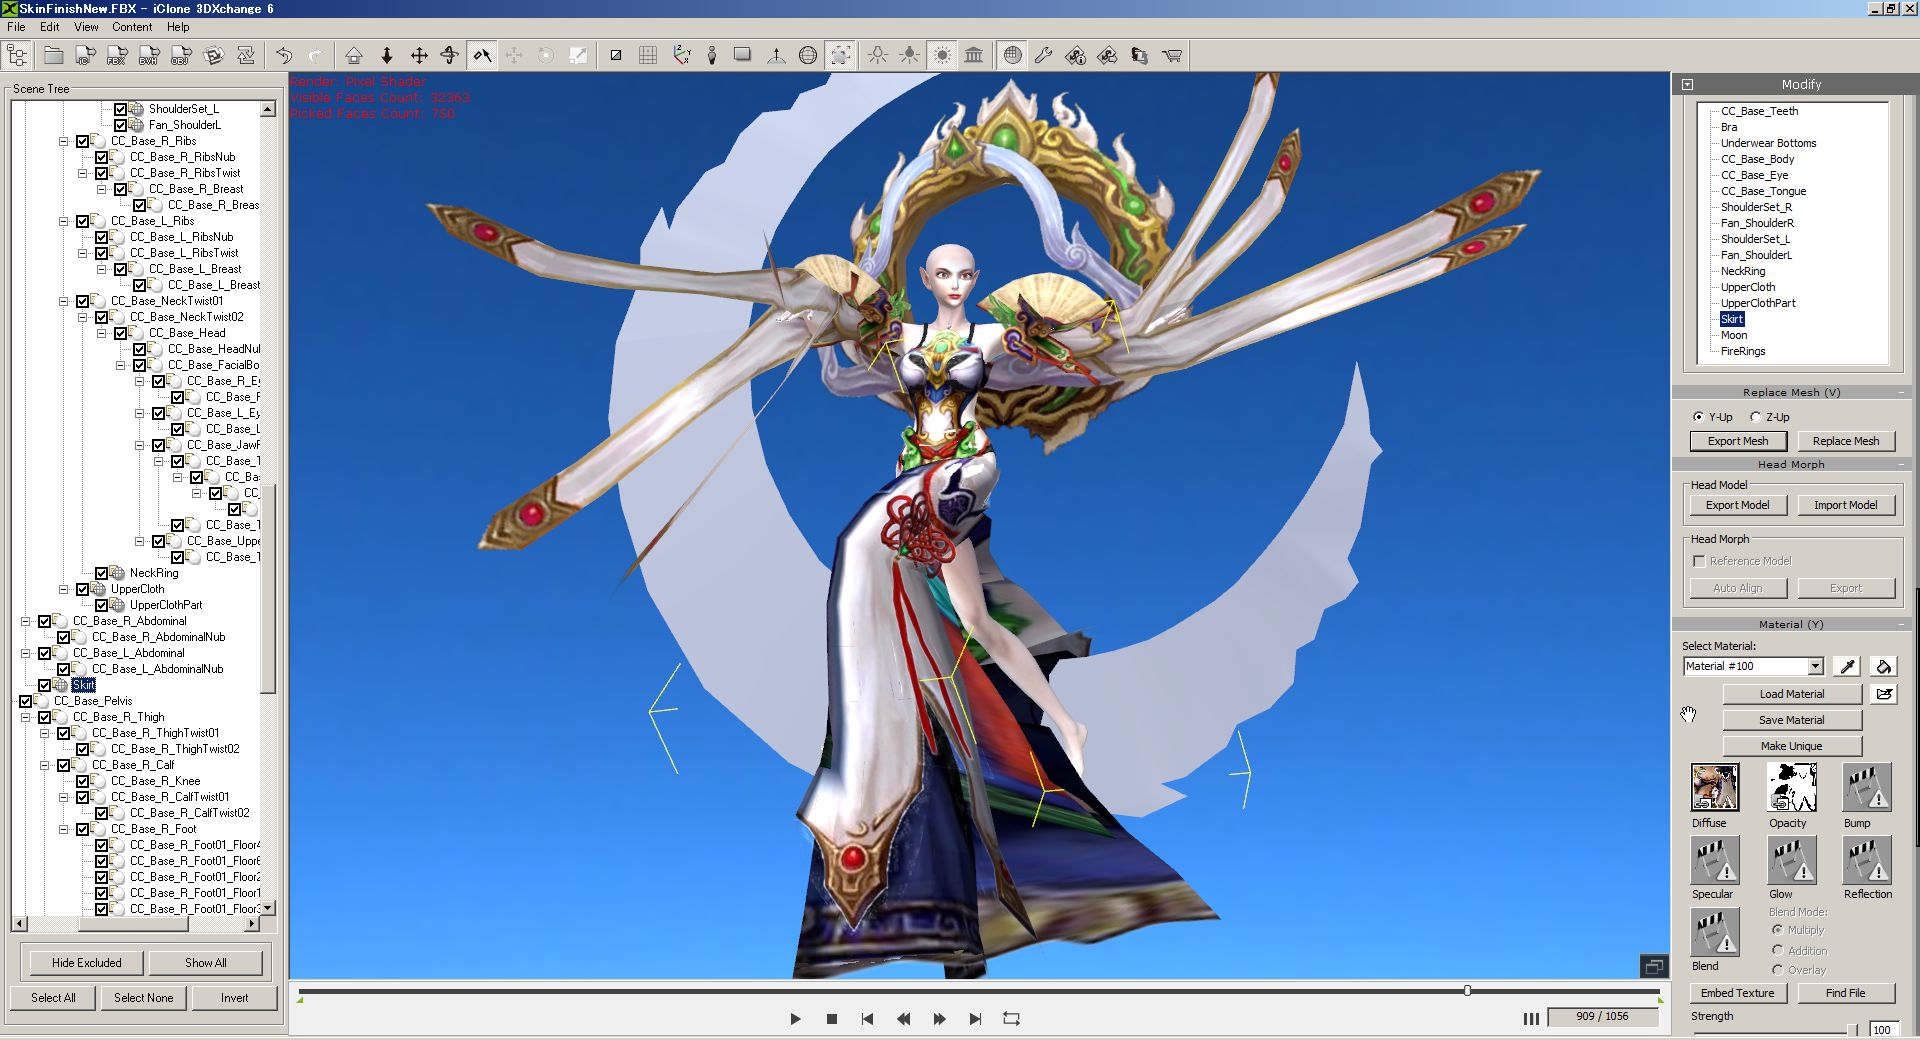
Confirm the Model in the 3DXchange. Scale the Model down to 1% ~ 0.8%. | |||||||||||||||||||||||||||||||||||||||||||||||||||||||||||||||||||
Texture data is not shown (.DDS format) |
||||||||||||||||||||||||||||||||||||||||||||||||||||||||||||||||||||
4) |
Change the Texture format from DDS to JPG for Diffuse and Opacity Image. | |||||||||||||||||||||||||||||||||||||||||||||||||||||||||||||||||||
|
||||||||||||||||||||||||||||||||||||||||||||||||||||||||||||||||||||
5) |
Export the Revised (Size and Texture) Model back to 3dsMax. | |||||||||||||||||||||||||||||||||||||||||||||||||||||||||||||||||||
3 |
Face Image Capture for CT8 3DHead Creation | |||||||||||||||||||||||||||||||||||||||||||||||||||||||||||||||||||
1) |
Zoom up the Face, remove hair tentatively and Capture the Face Image. | |||||||||||||||||||||||||||||||||||||||||||||||||||||||||||||||||||
The Face has 398 Polygon Count, Use Smooth Modifier/Auto Smooth.  |
||||||||||||||||||||||||||||||||||||||||||||||||||||||||||||||||||||
2) |
This image is enhanced in the FaceFilter3 (URL) and used as a reference in the CT8.
|
|||||||||||||||||||||||||||||||||||||||||||||||||||||||||||||||||||
3) |
Enhance the Image by any 2D Tool* . Change the Pixel Size to 2000x2000. | |||||||||||||||||||||||||||||||||||||||||||||||||||||||||||||||||||
*Adobe Firework CS6 is used in my test.  |
||||||||||||||||||||||||||||||||||||||||||||||||||||||||||||||||||||
4) |
Use 'Makeover' Tool on the 「Face Filter3 Pro」 Tool. | |||||||||||||||||||||||||||||||||||||||||||||||||||||||||||||||||||
 |
||||||||||||||||||||||||||||||||||||||||||||||||||||||||||||||||||||
4 |
3DHead Creation by CT8(Crazy Talk v8 Pipeline) | |||||||||||||||||||||||||||||||||||||||||||||||||||||||||||||||||||
1) |
Import the Face Image into CT8, Adjust Fitting Points at Fitting Stage. | |||||||||||||||||||||||||||||||||||||||||||||||||||||||||||||||||||
 |
||||||||||||||||||||||||||||||||||||||||||||||||||||||||||||||||||||
2) |
Adjust Slider at Detailed Morph Stage. | |||||||||||||||||||||||||||||||||||||||||||||||||||||||||||||||||||
 |
||||||||||||||||||||||||||||||||||||||||||||||||||||||||||||||||||||
3) |
Apply Eye Ball (Bright Eyes/Right Brown) and adjust the Size and Position. | |||||||||||||||||||||||||||||||||||||||||||||||||||||||||||||||||||
 |
||||||||||||||||||||||||||||||||||||||||||||||||||||||||||||||||||||
4) |
At Tool Bar, Select [Send Head to Character Creator]. (Fantasy Girl 3D Head) | |||||||||||||||||||||||||||||||||||||||||||||||||||||||||||||||||||
 |
||||||||||||||||||||||||||||||||||||||||||||||||||||||||||||||||||||
5 |
Using 「iClone CC Base Character」 with 「Fantasy Girl 3D Head」 | |||||||||||||||||||||||||||||||||||||||||||||||||||||||||||||||||||
1) |
When opening the 「Character Creator」, set [RLHead Import Options] and push OK. | |||||||||||||||||||||||||||||||||||||||||||||||||||||||||||||||||||
Check Import Head Morph. [Head and Body] for Import Texture is selected tentatively in my case. |
||||||||||||||||||||||||||||||||||||||||||||||||||||||||||||||||||||
2) |
Go to Modify/Mesh Modifier/Edit Mesh Mode and use Soft Selection to adjust shape. | |||||||||||||||||||||||||||||||||||||||||||||||||||||||||||||||||||
 |
||||||||||||||||||||||||||||||||||||||||||||||||||||||||||||||||||||
3) |
Go to Modify/Material/Texture Settings, edit* Comea Diffuse Image for better finish. | |||||||||||||||||||||||||||||||||||||||||||||||||||||||||||||||||||
 |
||||||||||||||||||||||||||||||||||||||||||||||||||||||||||||||||||||
4) |
Body Line (Proportion) Setting | |||||||||||||||||||||||||||||||||||||||||||||||||||||||||||||||||||
| 1) Prepare fine Template on a 2D tool ( Firework CS6 in this report) to support the next step. | ||||||||||||||||||||||||||||||||||||||||||||||||||||||||||||||||||||
 |
||||||||||||||||||||||||||||||||||||||||||||||||||||||||||||||||||||
| 2) Adjust the Base Model Body Mesh to have similar shape to the Template. | ||||||||||||||||||||||||||||||||||||||||||||||||||||||||||||||||||||
| 3) Export the CC Base Model with Calibration Motion (FantasyGirl_CCModel.FBX) | ||||||||||||||||||||||||||||||||||||||||||||||||||||||||||||||||||||
Visible Face Count: 30,126  |
||||||||||||||||||||||||||||||||||||||||||||||||||||||||||||||||||||
5) |
Comfirm the Exported Two Files: FantasyGirl_CCModel.fbx & FantasyGirl_CCModel.fbxkey. | |||||||||||||||||||||||||||||||||||||||||||||||||||||||||||||||||||
6 |
Applying the Parts from FBX Fantasy Girl Model to CC Character for Animation | |||||||||||||||||||||||||||||||||||||||||||||||||||||||||||||||||||
1) |
Load the FantasyGirl Model on the 3dsMax. | |||||||||||||||||||||||||||||||||||||||||||||||||||||||||||||||||||
 |
||||||||||||||||||||||||||||||||||||||||||||||||||||||||||||||||||||
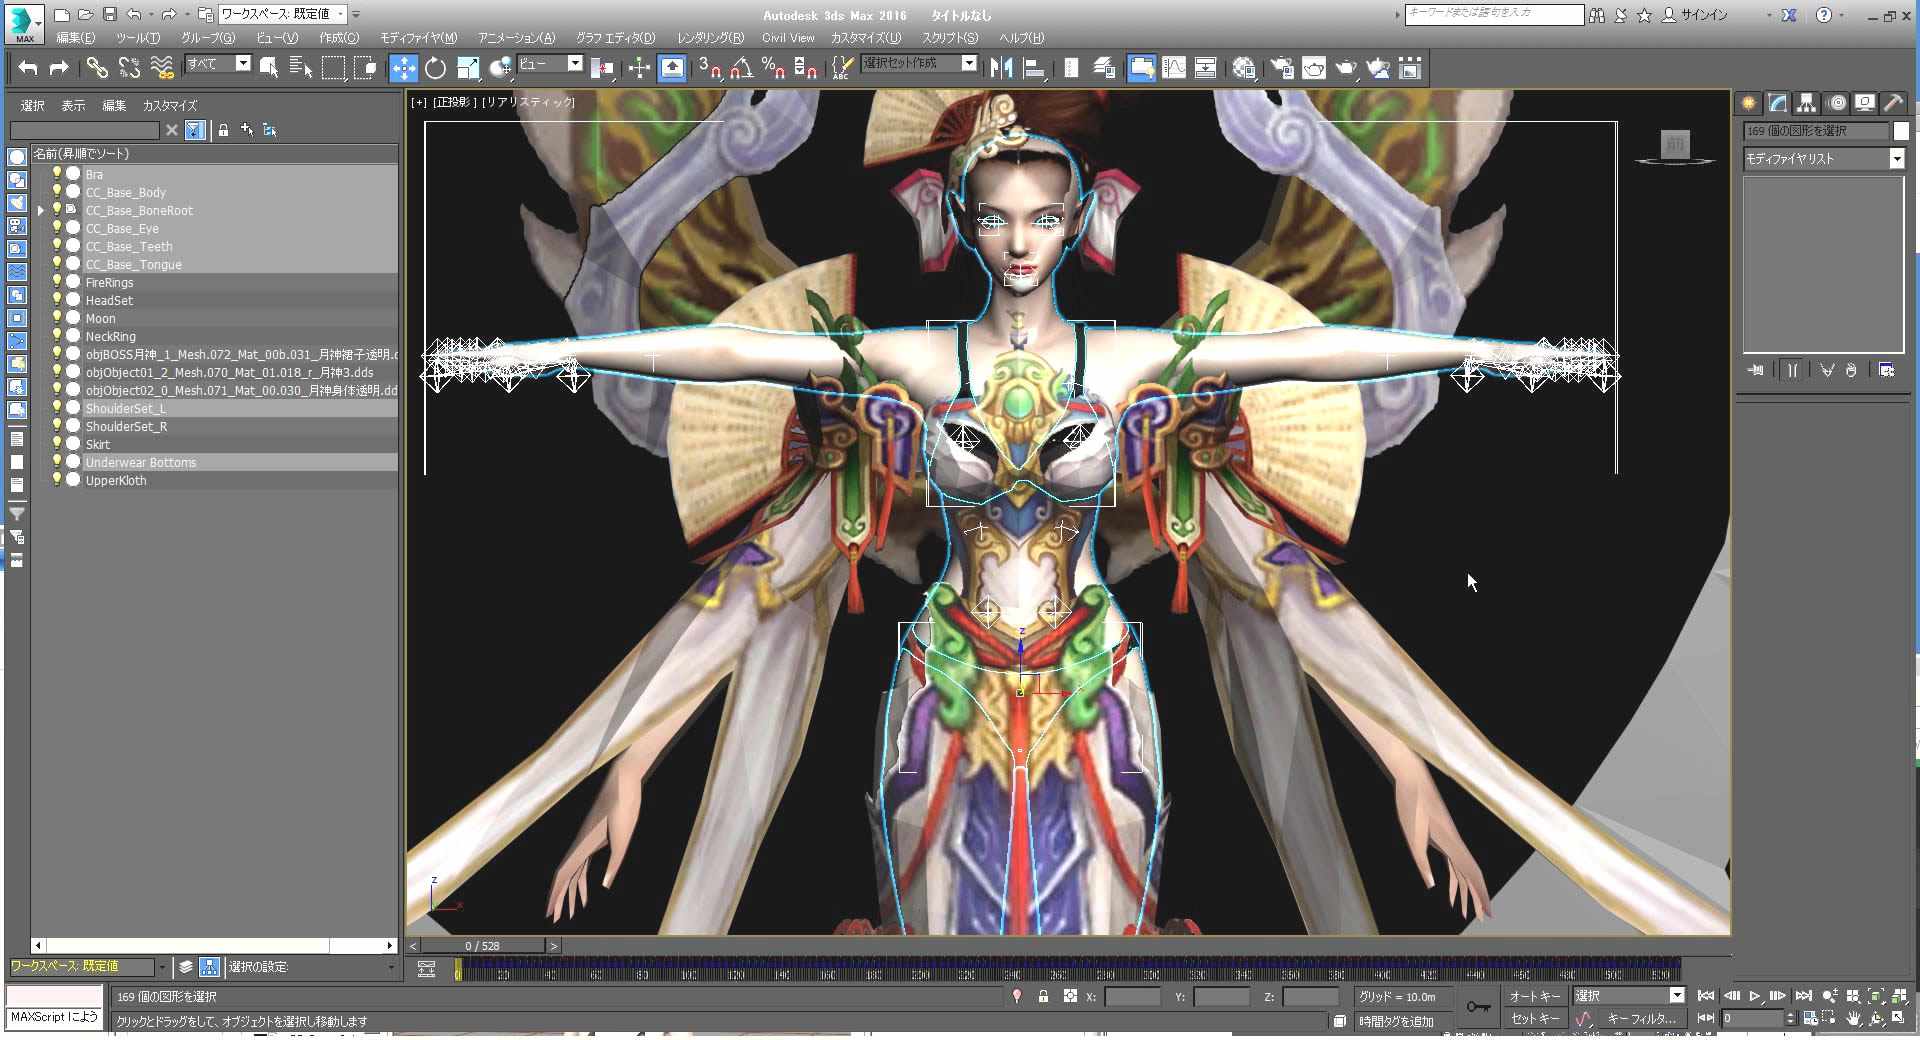
2) |
Detouch the body Parts, Name them and open Schematic Diagram. | |||||||||||||||||||||||||||||||||||||||||||||||||||||||||||||||||||
(Organize the location by the component group on the Schematic Diagram.) |
||||||||||||||||||||||||||||||||||||||||||||||||||||||||||||||||||||
3) |
Import (合成)CC Base Model to the center. | |||||||||||||||||||||||||||||||||||||||||||||||||||||||||||||||||||
 |
||||||||||||||||||||||||||||||||||||||||||||||||||||||||||||||||||||
4) |
Move the FantasyGirl Model to the left side and leave the Base Model to the center. | |||||||||||||||||||||||||||||||||||||||||||||||||||||||||||||||||||
 |
||||||||||||||||||||||||||||||||||||||||||||||||||||||||||||||||||||
5) |
Select Left shoulder Part, move and attach to the [CC_Base_L_Upperarm]. | |||||||||||||||||||||||||||||||||||||||||||||||||||||||||||||||||||
6) |
By using Schematic View, connect [Shoulder_L] parts to the [CC_Base_L_Upperarm]. | |||||||||||||||||||||||||||||||||||||||||||||||||||||||||||||||||||
7) |
Move timeline to confirm the result on the Calibration motion. |
|||||||||||||||||||||||||||||||||||||||||||||||||||||||||||||||||||
 |
||||||||||||||||||||||||||||||||||||||||||||||||||||||||||||||||||||
8) |
Select Skirt, move and attach to the [CC_Base_Waist]. | |||||||||||||||||||||||||||||||||||||||||||||||||||||||||||||||||||
 |
||||||||||||||||||||||||||||||||||||||||||||||||||||||||||||||||||||
9) |
Select UpperCloth, move and attach to the [CC_Base_Spine02] | |||||||||||||||||||||||||||||||||||||||||||||||||||||||||||||||||||
 |
||||||||||||||||||||||||||||||||||||||||||||||||||||||||||||||||||||
| 10) | Repeat the same process for BackRings and Moon. | |||||||||||||||||||||||||||||||||||||||||||||||||||||||||||||||||||
|
||||||||||||||||||||||||||||||||||||||||||||||||||||||||||||||||||||
| 11) | Head Set is to be attached in the iClone 6, as Ponytail hair part changes to Spring hair. | |||||||||||||||||||||||||||||||||||||||||||||||||||||||||||||||||||
 |
||||||||||||||||||||||||||||||||||||||||||||||||||||||||||||||||||||
| 12) | Save the Attach Completed Model with .max format for the Skin work. (Attach_Completed.max) | |||||||||||||||||||||||||||||||||||||||||||||||||||||||||||||||||||
| 13) | Export the Model with FBX format to 3DXchange. Confirm the Attach Status over the Timeline. | |||||||||||||||||||||||||||||||||||||||||||||||||||||||||||||||||||
At Material, check the 2-Sided to all Diffuse Area. Moon Texture is not converted properly at this moment. |
||||||||||||||||||||||||||||||||||||||||||||||||||||||||||||||||||||
| 14) | Attached Parts are following safely when the callibration motion is running. | |||||||||||||||||||||||||||||||||||||||||||||||||||||||||||||||||||
As for the Skinning: Once the Model Skinning is finished, CC can not import the FBX data, in my experiment.
|
||||||||||||||||||||||||||||||||||||||||||||||||||||||||||||||||||||
7 |
Detailed Mesh and Texture Enhancement before Skinning | |||||||||||||||||||||||||||||||||||||||||||||||||||||||||||||||||||
Mesh and Texture can be adjusted by the several ways. |
||||||||||||||||||||||||||||||||||||||||||||||||||||||||||||||||||||
1) |
When the Model is imported into CC, Modify/Edit Mesh can be used to hide the CC body part. | |||||||||||||||||||||||||||||||||||||||||||||||||||||||||||||||||||
 |
||||||||||||||||||||||||||||||||||||||||||||||||||||||||||||||||||||
2) |
Jaggy Textures can be refined by 3D Paint on the 3dsMax. | |||||||||||||||||||||||||||||||||||||||||||||||||||||||||||||||||||
3) |
At 3dsMax, use Viewport Canvas to paint the details. (Viewport Canvas Tutorial) | |||||||||||||||||||||||||||||||||||||||||||||||||||||||||||||||||||
 |
||||||||||||||||||||||||||||||||||||||||||||||||||||||||||||||||||||
4) |
Fix the UV bug: Use UVW Unwrap Modifier | |||||||||||||||||||||||||||||||||||||||||||||||||||||||||||||||||||
  |
||||||||||||||||||||||||||||||||||||||||||||||||||||||||||||||||||||
5) |
Export the Model with FBX format to 3DXchange and confirm the Fixed Status. | |||||||||||||||||||||||||||||||||||||||||||||||||||||||||||||||||||
This is a second work after study, the Fantasy Girl Model scale is 0.08, texture:2000x2000 Pix |
||||||||||||||||||||||||||||||||||||||||||||||||||||||||||||||||||||
8 |
Experiment of replacing the Ponytail Hair with Spring Hair. | |||||||||||||||||||||||||||||||||||||||||||||||||||||||||||||||||||
1) |
Shape the Tail Prop(Spring Hair) by using [Replace Mesh] in the 3DXchange with any 3D tool. | |||||||||||||||||||||||||||||||||||||||||||||||||||||||||||||||||||
This Tail prop is found in the Template/Prop/Spring in iClone. |
||||||||||||||||||||||||||||||||||||||||||||||||||||||||||||||||||||
2) |
Detouch Hair Ring mesh in 3dxMax, export to 3DXchange, then attach to Spring 05 on iClone 6. | |||||||||||||||||||||||||||||||||||||||||||||||||||||||||||||||||||
 |
||||||||||||||||||||||||||||||||||||||||||||||||||||||||||||||||||||
3) |
Spring Effect is confirmed when the CC Base Model moves. | |||||||||||||||||||||||||||||||||||||||||||||||||||||||||||||||||||
4) |
Remove the long hair mesh part from the Fantasy Girl Head Set in 3dsMax. | |||||||||||||||||||||||||||||||||||||||||||||||||||||||||||||||||||
5) |
Enhance Texture for Front HeadSet. Scale by 0.008 and send to iClone. (FrontHeadSet.FBX) | |||||||||||||||||||||||||||||||||||||||||||||||||||||||||||||||||||
Diffuse image Texture enhancement is done in Adobe Firework and replaced. |
||||||||||||||||||||||||||||||||||||||||||||||||||||||||||||||||||||
9 |
SkinWrap and Skin at 3dsMax: Skirt Part to the CC_Base_Body | |||||||||||||||||||||||||||||||||||||||||||||||||||||||||||||||||||
1) |
Select Skirt Part, select Utility and Click Reset XForm(Xフォームをリセット) and Reset Selected (選択をリセット). | |||||||||||||||||||||||||||||||||||||||||||||||||||||||||||||||||||
2) |
Select [Collapse (集約)] Utility and click [Collapse Selected (選択を集約)] | |||||||||||||||||||||||||||||||||||||||||||||||||||||||||||||||||||
3) |
At Modifier List, select [Skin Wrap (スキンラップ)]. | |||||||||||||||||||||||||||||||||||||||||||||||||||||||||||||||||||
 |
||||||||||||||||||||||||||||||||||||||||||||||||||||||||||||||||||||
4) |
Click Add (追加) button and click on the [CC_Base_Body] part. | |||||||||||||||||||||||||||||||||||||||||||||||||||||||||||||||||||
5) |
At Deformation Engine/Vertex Deformation, check on the [Weight All Points] and push [Convert to Skin] 「スキンに変換」も押す。 | |||||||||||||||||||||||||||||||||||||||||||||||||||||||||||||||||||
6) |
Confirm the Skin Result: | |||||||||||||||||||||||||||||||||||||||||||||||||||||||||||||||||||
Click on the [Skin] and slect [CC_Base_Pelvis] in the bone Table.  |
||||||||||||||||||||||||||||||||||||||||||||||||||||||||||||||||||||
7) |
Select Shoulder_L and repeat the same process. | |||||||||||||||||||||||||||||||||||||||||||||||||||||||||||||||||||
Fan should not be deformed by the skin. |
||||||||||||||||||||||||||||||||||||||||||||||||||||||||||||||||||||
8) |
Detach the Fan from Shoulder Parts and attach to the L_Upperarm . | |||||||||||||||||||||||||||||||||||||||||||||||||||||||||||||||||||
 |
||||||||||||||||||||||||||||||||||||||||||||||||||||||||||||||||||||
9) |
Deforming of Fan is Fixed. | |||||||||||||||||||||||||||||||||||||||||||||||||||||||||||||||||||
 |
||||||||||||||||||||||||||||||||||||||||||||||||||||||||||||||||||||
| 10) | UpperCloth | |||||||||||||||||||||||||||||||||||||||||||||||||||||||||||||||||||
 |
||||||||||||||||||||||||||||||||||||||||||||||||||||||||||||||||||||
| 11) | Move timeline and confirm the Skin Result on the Calibration Motion. | |||||||||||||||||||||||||||||||||||||||||||||||||||||||||||||||||||
 |
||||||||||||||||||||||||||||||||||||||||||||||||||||||||||||||||||||
| 12) | Export the Model with FBX format to 3DXchange, confirm the Skin Status. (Skin_Completed.fbx) | |||||||||||||||||||||||||||||||||||||||||||||||||||||||||||||||||||
 |
||||||||||||||||||||||||||||||||||||||||||||||||||||||||||||||||||||
| 10 | Characterize with Extend Mapping for Breast | |||||||||||||||||||||||||||||||||||||||||||||||||||||||||||||||||||
1) |
Open the Skinned Model on 3DXchange, apply AutoSmooth at Modify/Normal. | |||||||||||||||||||||||||||||||||||||||||||||||||||||||||||||||||||
2) |
At Modify/Material, click [2-Sided] for Skirt, Uppercloth, BackRings and Moon. | |||||||||||||||||||||||||||||||||||||||||||||||||||||||||||||||||||
 |
||||||||||||||||||||||||||||||||||||||||||||||||||||||||||||||||||||
3) |
Go to Modify/Character, push [Convert to Non-Standard] button. | |||||||||||||||||||||||||||||||||||||||||||||||||||||||||||||||||||
4) |
Select both [CC_Base_R/L_Breast]. Push [Map to Extend Bone] and [Convert] icon. | |||||||||||||||||||||||||||||||||||||||||||||||||||||||||||||||||||
 |
||||||||||||||||||||||||||||||||||||||||||||||||||||||||||||||||||||
5) |
Go to Modify/Spring, Push [Edit Spring]. | |||||||||||||||||||||||||||||||||||||||||||||||||||||||||||||||||||
6) |
Select [CC_Base_R/L_Breast] and push [Active Spring]. | |||||||||||||||||||||||||||||||||||||||||||||||||||||||||||||||||||
7) |
Preview the Apply Motion and adjust the Breast Spring Settings. | |||||||||||||||||||||||||||||||||||||||||||||||||||||||||||||||||||
Example
 |
||||||||||||||||||||||||||||||||||||||||||||||||||||||||||||||||||||
8) |
Push [Apply] button. | |||||||||||||||||||||||||||||||||||||||||||||||||||||||||||||||||||
| 11 | Setup of Head Set and Ponytail in 3DXchange and iClone 6 | |||||||||||||||||||||||||||||||||||||||||||||||||||||||||||||||||||
1) |
Import Head Set, attach the Ponytail Hair to the Head. | |||||||||||||||||||||||||||||||||||||||||||||||||||||||||||||||||||
 |
||||||||||||||||||||||||||||||||||||||||||||||||||||||||||||||||||||
2) |
Load the Model into 3DXchange, confirm the Spring Setting. | |||||||||||||||||||||||||||||||||||||||||||||||||||||||||||||||||||
 |
||||||||||||||||||||||||||||||||||||||||||||||||||||||||||||||||||||
| 12 | Viseme setting for Voice Message | |||||||||||||||||||||||||||||||||||||||||||||||||||||||||||||||||||
1) |
Go to 3DXchange, Open Expression Editor and confirm the Viseme lip shape. | |||||||||||||||||||||||||||||||||||||||||||||||||||||||||||||||||||
| [CC_Base_UpperJaw] is not working properly in my test. Need more investigation. (When UpperJaw moves, Upper Teeth is moving, thus not possible to open upper Lips)  |
||||||||||||||||||||||||||||||||||||||||||||||||||||||||||||||||||||
| 2) | Make a Test Voice in the AVATAR TTS ON-DEMAND. | |||||||||||||||||||||||||||||||||||||||||||||||||||||||||||||||||||
 |
||||||||||||||||||||||||||||||||||||||||||||||||||||||||||||||||||||
| 13 | Tryal Video | |||||||||||||||||||||||||||||||||||||||||||||||||||||||||||||||||||
1) |
Open iClone 6, Load the CC Model and apply Voice Message. | |||||||||||||||||||||||||||||||||||||||||||||||||||||||||||||||||||
2) |
Prepare Image and Sound for the Background. | |||||||||||||||||||||||||||||||||||||||||||||||||||||||||||||||||||
|
||||||||||||||||||||||||||||||||||||||||||||||||||||||||||||||||||||
3) |
Make Scenario and Edit the Timeline according to the Message. | |||||||||||||||||||||||||||||||||||||||||||||||||||||||||||||||||||

|
||||||||||||||||||||||||||||||||||||||||||||||||||||||||||||||||||||
4) |
Edit the Model Motion on the timeline. | |||||||||||||||||||||||||||||||||||||||||||||||||||||||||||||||||||
 |
||||||||||||||||||||||||||||||||||||||||||||||||||||||||||||||||||||
5) |
Current Issue as of 2016.10.15 | |||||||||||||||||||||||||||||||||||||||||||||||||||||||||||||||||||
1) Can not adjust Mouth Shape properly within the Viseme Table. |
||||||||||||||||||||||||||||||||||||||||||||||||||||||||||||||||||||
Dated: 2016.10.15 Hirospot (Hiro Nakazawa) |
||||||||||||||||||||||||||||||||||||||||||||||||||||||||||||||||||||
| 14 | Issue1) Findings: Comparison of Editor | |||||||||||||||||||||||||||||||||||||||||||||||||||||||||||||||||||
1) |
[.RLTalk] is created in the CT8 and exported from File>Export>RLTalk. iClone 6 | |||||||||||||||||||||||||||||||||||||||||||||||||||||||||||||||||||
2) |
iClone 6.5 can import this file from File>Import, or, Modify>Facial>Create Script>Script File. |
|||||||||||||||||||||||||||||||||||||||||||||||||||||||||||||||||||
3) |
Lip Shape in the CT8 is properly reproduced on the Default CC Model in iClone 6, however, final Fantasy girl CC Models in this report are different. | |||||||||||||||||||||||||||||||||||||||||||||||||||||||||||||||||||
4) |
CT8 and iClone 6.5 has the same Lips Editor, whareas 3DXchange shows the different Expression Editor for the FBX Exported Models. | |||||||||||||||||||||||||||||||||||||||||||||||||||||||||||||||||||
|
||||||||||||||||||||||||||||||||||||||||||||||||||||||||||||||||||||
5) |
Character Setup and Morph List of the CC Base Model changes after FBX export. | |||||||||||||||||||||||||||||||||||||||||||||||||||||||||||||||||||
|
||||||||||||||||||||||||||||||||||||||||||||||||||||||||||||||||||||
| To be Continued | ||||||||||||||||||||||||||||||||||||||||||||||||||||||||||||||||||||
Edited: 2016.10.24v1 Hirospot (Hiro Nakazawa) |
||||||||||||||||||||||||||||||||||||||||||||||||||||||||||||||||||||