|
3D Character Web Creation by Autodesk Character Generator (2016)
(Work in Process) |
Demo Video
Not Ready
|
Royalty-Free FBX Characters for iClone Use
|
3DXchange6 Pipeline
test series 7 (28)
2016. 4. 10 Hirospot (Personal Site) |
|
|
Autodesk Character Generator has been introduced as Web based handy tool
works on the Web Browser for anyone to Customize 3D figures for animation.
Thanks to Autodesk, Generated model has FBX format, royalty-free, and comes with
body bones and many preset Facial Morphs for both action and intellectual Animation Expressions.
|
Accoring to Autodesk, there are Four Account types for the Character Generator user;
No Benefit, Student, Subscription and M&E DCC Subscription.
No charge is required for the very basic creation, however, the 'Cloud Credits' are required for getting more practical needs such as artistic Hair style, higher grade model, Facial Expression and FBX data Exporting.
This Croud Credits are only available for Student and other two Subscription members.
Minumum Subscription price is 8,640 Yen for a year with 100 credits, by that, 20 FBX Models exportings are possible.
The model quality and features are managed in the export table such as Poly Resolutions, Character Height, Facial Expression types and FBX target tools.
As for the created character features,
1)
Upper cloth is painted (mapped) on the body skin.
2) Skirt and body is made by single mesh.
3)
Both eyes, teeth and gums are embedded in the face with bones. |
|
About iClone Use:
1) Once imported into 3DXchange, Characterizing is just easy by one click on 'Maya' presets for the basic bones.
2)
Hair and cloth have no bones, but Body bones can have spring motion settings.
3)
Mouth and Eyes movement by Expression Editor. It's really nice that Plenty of Facial Expressions are set with minimum effort.
4)
All these profile data can be saved and transfered to next model.
5) Confirmation might be neccessary but, in Local Environment, by using 3DXchange and other 3D tools, Diffuse J-peg image and Mesh shape can be edited and replaced for personal use, if needed.
To conclude, Autodesk Character Generator is very friendly and efficient tool for iClone Animation Pipeline users.
|
|
Web Service Offerings |
Account with No Benefit |
Account on Subscription |
Student Account |
Account on M&E DCC Subscription |
Cloud credits |
No Cloud credits |
50 Cloud credits
with the ability to purchase additional Cloud credits.
|
Unlimited Cloud credits |
The number of Cloud credits depends on the contract or contracts that provide you access to the Character Generator Benefit. |
Character
Download |
No access to Paid Offerings |
5 Cloud credits regardless of the paid offerings |
| Name |
Autor |
Description |
| iClone character animation |
Steve Holmes
3D expert John C Mrttin II |
Easy to understand explanation of the Animation work flow from Autodesk Character Generator to 3DXchange, and iClone.
Step 01 – Generate a character
Step 02 – Convert your character
Step 03 – Set up the facial expressions
Step 04 – Export into iClone
Step 05 – Animate and lip-sync the character
Step 06 – Finalise and export your animation |
AREA JAPAN 日本語
|
|
AUTODESK CHARACTER GENERATOR
Explaining several majour features. |
AUTODESK
CHARACTER GENERATOR |
Compare free vs. paid features |
'paid' only by Cloud Credit which minimum price is $100.
(Cloud credits are sold in packs of 100 for $100 USD) |
| HELP |
Get started here, learn, manage, how to Customize a Character, etc. |
| Web Service Offerings |
The Service Offerings vary depending on your account type and status |
| Essential Skills Videos |
Getting started with Character Generator
Customize a Character
Generate your Custimized Character
Preview and Edit your Generated Customized Chracter
Download your Generated Customized Character
|
| AUTODESK.ストア 日本語 |
Character Generator |
Subscription Order Page |
|
| 1. First step of the AUTODESK CHARACTER GENERATOR (Overview) |
1-1 |
Access the following Page and Sign in. |
| |
|
1-2 |
Click the 'New' letter to start generating a new character. |
| |
|
1-3 |
Default image is shown. |
| |
22 characters in the Standard set have different face and body shape.
|
|
(Note) Artistic Style Selection can be expanded by changing the users Autodesk Account. |
| |
Initial Artistic Style Selection |
Artistic Style Selection for Specified Account User |
 |
Yellow  button is the Cloud credit alert icon to indicate the access unable to the paid offerings. button is the Cloud credit alert icon to indicate the access unable to the paid offerings. |
 |
Characters generated from this Artistic Style require purchase. |
|
1-4 |
Click each face icon and observe the shown portrate, looking for a character preferable for the target model. |
| |
Left: Initial image of 'Roxanne' Character
 |
1-5 |
Push the 'Customize' button at the bottom left to proceed. |
| |
|
2. Customizing the Face (for Japanese Young Girl Looks) |
2-1 |
Modify the Face part shape by using 7 sliders to blend between two faces. |
| |
Use rotate tool to show other face angle. (Take few minutes)
 |
2-2 |
Select Skin to get the target Face look. |
| |
Use 'Show Variations' button to show two Make-up Variations.
 |
2-3 |
Selection from Male template is possible. |
| |
|
2-4 |
|
Click 'Eye' icon at the center and select the eye color from template. |
|
| |
Eyelash is a image on the Face Skin. False Eyelash is not included.
|
2-5 |
Select Hair icon, decide the hair style and color. |
| |
9 different colors in the Show Variations
|
2-6 |
Detailed adjustment of Face is possible by selecting the facial part. |
| |
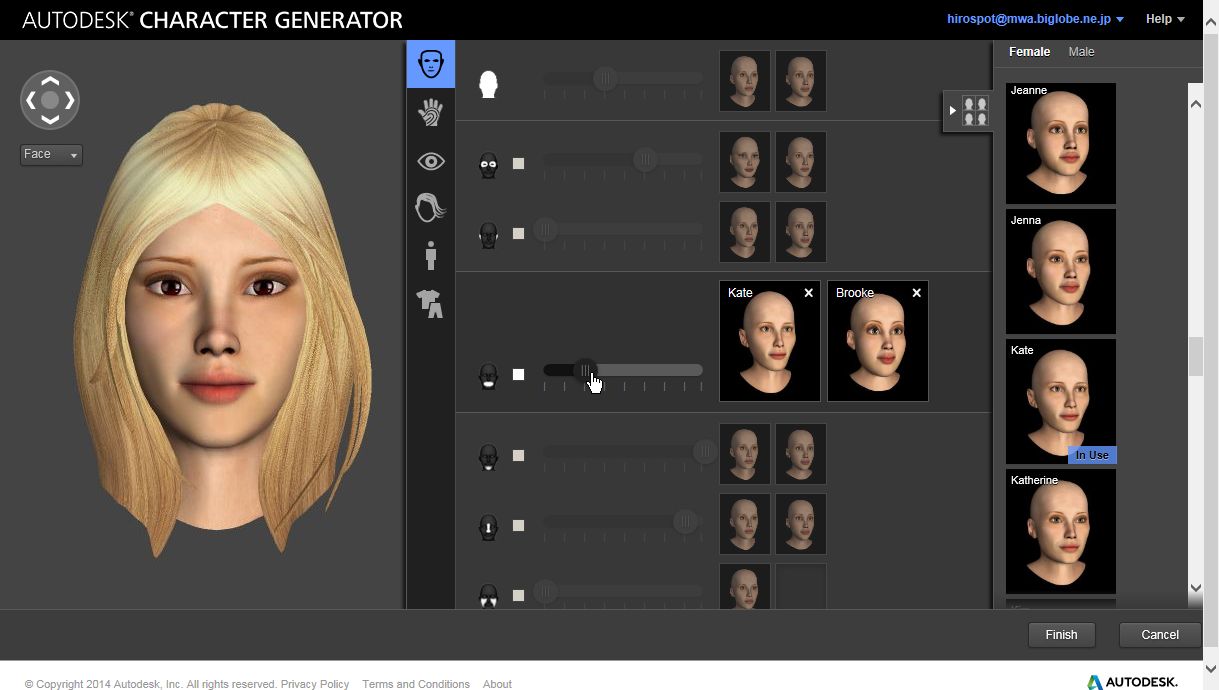
Ex. To get the plump cheeks, push Face icon, open Face library and select the other face for blending.
 |
2-7 |
Eyes shape can be modified by blending two faces. |
| |
Open the 'Face Catalog' to find more faces, sorted by their Names.
 |
2-8 |
When waving hair is needed, select the shaved head and use the G6 Hair in iClone6 Accessory. |
| |
|
2-9 |
Bun Hair look |
| |
|
2-10 |
Different Look: Face/Hair and Eye. |
| |
|
3. Style Creation on the web
|
3-1 |
Click 'Clothing' icon and select the target in the temopate. Select Top first. |
| |
Style_1: Uniform
|
3-2 |
Select other Top. Select Bottom to match the top. |
| |
Style_2: Doctor
 |
3-3 |
Try different combination in Top and Bottom template. |
| |
Style_3: Casual
|
3-4 |
Use 'Shoes' template to change the shoes. |
| |
Style_4: Outdoor
|
3-5 |
Selection from Male template is also possible. |
| |
Style_5: Sport
 |
3-6 |
Try Different look. Body component size can be adjusted by selecting Body icon. |
| |
Style_6: Formal
 |
3-7 |
Adjust Breasts size by Body/Breasts Slider. |
| |
Style_7: Party
 |
3-8 |
When each creation is finished, push the Finish button and type the character name. |
| |
|
3-9 |
Saved Characters are listed on the Web Page and can go back to them for further creation work. |
| |
|
3-10 |
Go to Chapter 5 & 6 for the next process. |
| |
|
4. About Paid Offerings Reminder (for the first time)
|
4-1 |
At Generated Character, Thumbnail shows up with the yellow alert.
|
4-2 |
Following Notice shows up when the mouse pointer is placed on the alert. |
| |
Notice:You cannot geterate a character that was customized using paid offerings.
 |
4-3 |
Click the yellow alert and the following 'Paid Offerings' remider comes up.
|
| |
Your account allows you to design but not to generate or download a character using this Artistic Style.
To upgrade your account, see Account & Paid Offerings.

|
4-4 |
'Cloud Credits' are needed to clear this reminder by getting the Autodesk Subscription Account. |
| |
Web Service Offerings |
Account with No Benefit |
Account on Subscription |
Student Account |
Account on M&E DCC Subscription |
Cloud credits |
No Cloud credits |
50 Cloud credits
with the ability to purchase additional Cloud credits.
|
Unlimited Cloud credits |
The number of Cloud credits depends on the contract or contracts that provide you access to the Character Generator Benefit. |
Character
Download |
No access to Paid Offerings |
5 Cloud credits regardless of the paid offerings |
|
4-5 |
Visit the AUTODESK.store (of your own country) and order the Subscription. |
| |
(Sample: Japanese site)
 |
5. Exporting the Test Character (for the First Time)
|
5-1 |
On Subscription Account, Export Gate for the Test Model comes up. |
5-2 |
Export Options is managed on the 'Generate Character' Dialog box. |
| |
Blue Cloud credit icon  is shown to identify the paid offerings. is shown to identify the paid offerings. 
|
5-3 |
For the test purpose, select Facial Bone rig and push 'Generate' button on the Dialog box. |
| |
 |
Test Model-1 Options Setting Sample
Options Name |
Selected |
In 3DXchange |
Poly Resolutions |
Medium |
Approx. 17,000 Count |
Facial Expressions |
Facial bone rig |
Use Expression Editor |
Generate |
Generic .fbx |
Select Maya Human-IK |
|
|
5-4 |
Green check mark is shown for indication. Click the arrow (Purchase and Download) button to process. |
| |
|
5-5 |
Push the Purchase & Download Button. Download Model image comes up. |
| |
Credit Balance is shown at the bottom.
|
5-6 |
5 credit is needed for a download. 20 models can be downloaded within given 100 credits. |
5-7 |
Compressed Test_Model.fbx file is shown in the download folder. |
5-8 |
Unzip the file and Locate it to the Work Folder. |
| |
|
6. Basic Step of Generating the next Models by Using the same Character |
6-1 |
Click the Sign-in Button at the Autodesk Web Site. |
6-2 |
Character Genarator opens with the Test Model created before. Click the 'Edit' icon. |
| |
|
6-3 |
Select another Costume. |
| |
|
6-4 |
Select another Hair. |
| |
|
6-5 |
Modified Model (Test Model-2) is added. |
| |
|
6-6 |
Change the Options; Select 'High' for Poly Resolution and 'Facial blend shapes' for Facial Expression. |
6-7 |
Click 'Generate' button on the Dialog. |
| |
 |
TestModel-2 Options Setting Sample
Options Name |
Selected |
In 3DXchange |
Poly Resolutions |
High |
Approx. 60,000 Count |
Facial Expressions |
Facial blend shapes |
Use Expression Editor |
Generate |
Generic .fbx |
Select Maya Human-IK |
|
|
6-8 |
New Model is added, Click Green Check mark Number and 'Purchase & Download' mark appears. |
| |
|
6-9 |
Click the Save button. |
| |
|
6-10 |
Unzip the TestModel-2. |
| |
|
7. Importing the Test Model-1 (Facial bone rig)
|
7-1 |
At 3DXchange, Go to File/Open and load the FBX Test Model data. |
| |
|
7-2 |
The Test Model is shown in T-pose. The model has 170 cm height, so almost same size with dummy. |
| |
|
7-3 |
Adjust Material value as shown below. |
| |
|
Specular |
Opacity |
Strength |
Normal/
Auto Smooth |
Body |
0 |
100 |
100 |
On |
Eye |
0 |
0 |
Hair |
0 |
100 |
 |
7-4 |
At Characterization Profile, select Maya Human-IK and check Active. |
| |
|
7-5 |
Facial Bones are shown. |
| |
|
7-6 |
BoneMapping for Facial Expression: Work in Process |
| |
|
| |
Mapping Test ( Pending)
Facial Bone Name |
Assign Bone Tags |
Expression Editor Confirmation |
Right/Left Eye |
Map to Face |
(Note) |
UpperLidR/UpperLidL |
Set UpperLid for Auto-Blink /Map to Face |
Muscle/Eyes Blink OK |
Jaw |
Map to Jaw |
Jaw OK |
LipCornerR/L |
Map to Jaw/ Map to Face |
|
LipUpperR/L |
Map to Extend Bone/Map to Face |
|
LowerLidR/L |
Map to Right/Left Eye/Map to Face |
|
BrowInnerR/L |
Map to Right/Left Eye /Map to Face |
|
BrowOuterR/L |
Map to Right/Left Eye /Map to Face |
|
CheeksR/L |
Map to Jaw/Map to Face |
|
Nostliris |
Map to Face |
|
(Note) Do not Map to Eye, otherwise 'Look At Camera' features can not be used in iClone.
|
| |
 |
| |
Click Expression Editor Button, Set Head, Eye & Jaw. |
| |
Viseme: Pending |
| |
|
| 8. Importing the Test Model_2 (Facial blend shapes) and Local Modification (1) |
8-1 |
Open 3DXchange, go to File/Open and open the Test Model_2.fbx. |
|
Adjust Material Specular Value (100 to 0) for Body and hair.
Set Opacity to 0 for '_Eye-trans' Material.
Change Strength 80 to 100.
Normal(O)/Click 'Auto Smooth' button.

|
8-2 |
Characterize is very easy. At Characterization Profile, select Maya Human-IK and check Active. |
| |
|
8-3 |
Bone Map to both eyes and breasts. |
| |
|
8-4 |
Open the .fbm folder of the .fbx file and find the texture .jpg data. |
| |
|
8-5 |
Edit the Diffuse Image in a Texture Editor. (Edit Target: Lip Color and Dress) |
| |
Save the edited image by different name and click Diffuse icon, open the image and click the 'Make Unique' button.
|
8-6 |
Reshape the Body mesh: Go to Modify/Replace Mesh and Click 'Export Mesh' button. |
| |
Character Generator Exported
 |
Edited in the N-Sided QUIDAM 3
 |
|
8-7 |
Modified Face and Dress for Test Model_2 is shown. Click the 'Make Unique' button when texture is modified. |
| |
|
| |
|
| 9. Bone Setting and Expression Editor for the Model (Facial blend shapes) |
9-1 |
TestModel-2 comes with many built-in facial morphs. |
| |
|
|
At Expression Editor, Set the Mouth shape by adjusting morphs slider for Lipsync Animation. |
| |
Save the Viseme Profile (.3dxFaceAnimProfile) for the further use.
 |
|
Go to Muscle, Set each part in the Brow & Eyelids table. |
| |
|
|
Go to Custom, Use Custom Groups for the Other Expressions. |
| |
|
|
Saved Facial Animation Profiles can be loaded to the other models. |
| |
|
| |
|
|
Activave the Spring for Breasts, determin the Group Setting by the motion preview. |
| |
Use Export Setting to save the setting (.spx) for further use.
|
| |
Item |
Setting |
Spring
Type |
Translate |
5 |
Group
Setting |
Mass |
5-7 |
| Strength |
6 |
| Bounciness |
6-9 |
|
|
|
At Modify/Chracter, push 'Apply to iClone' button. |
| |
|
10. Additional Local Modification based on 3DXchange Pipeline and 3D Tool |
10-1 |
Use 'Replace Mesh' button for Editing the Body Mesh. |
| |
Ex: Editing Cuffs edge and V-necked texture
 |
| |
(Ex: Quidam 3.5 Studio) Go to File/Import Custom Props, confirm the Import Object Panel. |
| |
|
|
Both Mesh and Texture can be edited.
 |
| |
Click 'Replace Mesh', select the Replaced Mesh obj. file. |
| |
|
10-2 |
Use 3D tool to modify the Image Distortion painted on the Model. |
| |
 |
| |
Use Constraints tool to correct image distortion

|
| |
 |
| 11. Additional Local Modification based on iClone 6 Accessories and Props |
11-1 |
Adding Hair on the Test Model |
| |
When Flying Hair is needed, apply G6 Hair. |
| |
 |
| |
|
11-2 |
Adding Props (Necklace and Earrings) |
| |
Accessories/Hottest Hairstyles/Accessory/Necklace_A_Pearl (Need more test)
Terms of Endearment/Silver-Earring

|
11-3 |
Adding Props (Heels) |
| |
Heels Props :MMD iRon0129 (Modified)

|
| |
|
12. Facial Animation (Viseme Test) in iClone |
|
Click the Test Model, open Modify/Motion, Set the default posture and save the Model Posture as Project. |
| |
|
|
Go to Content/Facial Animation, Apply G6 Heidi_Talk for her Facial Animation Test. |
| |
|
| |
|
| |
|
13. Demo Video by Test Models |
|
Create Speech sentense for Demo Video. |
|
Open iClone, go to Modify/Motion/Facial/Create Script and open Text to Speech Editor.
Click 'Additional Voices'. |
|
At Reallusion Avatar TTS On-Demand page, use US English, Felmale1, Pitch=35-44, Speed=-2. |
|
Enter the speech sentense and push green 'Preview' button. |
| |
|
| |
(To be Continued) |
| |
|
3D Character Web Creation and Local Modification
iClone-3DXchange6 Pipeline test series 28:
2016. 4. 10 Hirospot (Personal Site)
|