Click! Hirospot Welcome to Hirospot Personal Site on FC2 Hirospot Click!
Japanese Yukata-Komachi-Lady by CC Base Character
CC2.0 Beta Test Report: Customizing Poser Hair, Kimono and CC Character
Trial Video: Not Ready
Personal report for the Character Creator Operation
3DXchange 6 Pipeline Test Series 12 (33)
Dated: 2017.2.9 Hirospot (Hiro Nakazawa)

Top1

Top2
By using Character Creator, Human face can be customized with minimum effort by adjusting Head Morphs parameters, however, making hairs and clothes for the CC Base Character need a creative sculpting skills and experience on the several 3D Tools.

Thanks to the Poser creators, beautiful 3D outfit works are available for free in the internet.

[Komachi-Hair] is a typical Japanese Maru-mage Hair style for married women started in Edo period and Fujiko Mine, the Japanese Poser Artist created the Komachi-Hair as Poser Props in 2009. It is available on the ShareCG site even now.

[MMYukataForA3] is Kimono dress for Poser Aiko3 created by mamomamo as a study.

This trial report is for understanding Character Creator Atmosphere operation and making clothed Japanese Woman which outfits are customized from these Poser Props (Yukata and Traditional Hair).

These Hair and Yukata are exported from Poser by OBJ format for further customizing.


Report Chapter
Explanation
Chapter 2
① Data conversion by Poser: OBJ Exporting
Chapter 3
② Hair Material setting on the 3DXchange,
Chapter 4
③ Oriental Model creation on the CC2Beta
Chapter 5
④ Attaching the Hair on the Model head in iC6.5
⑤ Exporting the Hair Model from 3DX to CC2Beta,
Chapter 6
⑥ Yukata Material setting on the 3DXchange, export Yukata.obj
Chapter 7
⑦ Skinning Yukata on the other Tool (3ds Max), 
Chapter 8
⑧ Model importing with fbxkey into CC2beta.


Tools
Version
Vendor
Main Function
Poser Pro 11 11.0.5.32974 Smith Micro Open .pz3 and Export .OBJ
3DXchange 5 Pipeline 6.52.2220 Reallusion Material &, Data Conversion
iClone 6.5 Pro 6.5.3351.1 Reallusion Attach Props to the Model Body
Character Creator 1.5 1.52.2204 Reallusion Head Morphs
Character Creator 2.0 Beta 2.0.1229.1 Reallusion Head and Body Morphs
3D Tool (3ds Max 2016/17) 18/19 Autodesk Skin Yukata mesh to the CC Base Body

Reference Video
Made by
URL
Description
Reallusion Character Creator Pipeline Michael Centkowski Showcase of Character Creator Pipeline
Basic Clothing Creation
-Reallusion Character Creator/zBrush/Max
WarLord720
Creating Custom Clothings by other 3D Tools.
Character Creator 1.5 Tutorial-Accessory Creation
Reallusion
Accessory Creation Process
Character Creator 1.5 Tutorial-Hair Creation
Reallusion
Hair Creation Process
Character Creator 1.5 Tutorial-Cloth Creation
Reallusion
Cloth Creation Process
Character Creator 1.5 Tutorial-Import Daz3d, Poser, Clothing using Blender
Cartoon Components
Import Clothing into CC using 3DXchange 6
Character Creation Master Series-Pirate Creation Part1/2/3/4/5/6:Designing a Base Mesh for CC
Reallusion

All the process of creating Character with custom cloting
.


Poser Props
DL Link
Creator (Site)
小町髪 Komachi-Hair (maru-mage) for V4 Fujiko Mine
yukata Set (with Uchiwa) MMYukata for A3.zip mamomamo.candypop.jp


1
Get the Komachi-Hair at sharecg.
 
Komachi-Hair
copyrights Creator: Fujiko
Downladed File:1.98MB
Zip
Component
Unzip
2
Open Komachi-Hair on Poser and Export File by Wavefront OBJ.


(Poser) Komachigami.pz3
PoserExportOBJ
3
Organize the Hair Material on 3DXchange.
3-1
Go to File/Open and load the KomachGami.obj. (KomachiGami=Komachi-Hair)
 
(3DXchange 6.52)
KomachiGami_3DX
3-2
Move the KomachiGami Hair to the Dummy Head and scale the Hair.
 
MoveScaleHair
3-3
At Modify/Material, select the part and apply Mateials.
 
Materials
3-4
Use Blend and select Multiply at Blend Mode.
 
Blend
3-5
Select the hair part, Make the Deffuse color to White, and apply Hair Material.
 
Hair
3-6
Apply Opacity to the finges of the Hair.
 
(3DXchange 6.52)Opacity
3-7
Go to Modify/Node(I), Click [Apply to iClone].
 
Apply2iClone
3-8
iClone 6.5 opens and [KomachiGami] is shown as iProp. (KomachiGami=Komachi-Hair)
 
iC6_Komachi
4
Prepare the Oriental Model on the Character Creator.
4-1
At CC1.52, [Asian Female] at Actor Project/Base/Essential Morphs has found with brown eyes.
 
(Character Creator 1.52)
CC1.5_AsianFemale
4-2
Find the [Essential Morps] Folder in CC1.5, copy & paste it into the Template/Project/Base/ in CC2.0Beta.
 
EssentialMorphs
  Copy [Essential Body Morphs] and [Essential Head Morphs] in the CC1.5 AvatarControl Folder, too.
 
AvatarControl_CC12.0Beta_1.11
4-3
[Asian Female] is shown at [Content/Actor Project/Base/Essential Morphs] on the CC2.0 Beta.
 
(Character Creator 2.0 Beta)
AsianFemale_CC2Beta
4-4
Go to Modify/Morphs/Actor/Heads, and use Facial parameters for the target face look.
 
FacialMorphs
4-5
Facial Morphs adjustment to my liking as a Japanese lady.


(Character Creator 2.0 Beta)
CC2Beta_Morphs
(Save Project As: AsianFemale_CC1.5.ccProject)
4-6
Use [Edit Mesh Mode] Soft Selection for the additional shaping.
 
EditMesh
4-7
Apply [Make-up Diva] and Underware, go to File/Export/iAvatar.
4-8
At Export iAvatar/Export Resolution, select [CC1.5 & iClone 6.5] and Export.
 
(Character Creator 2.0 Beta)
Export_iAvatar_J
Note: Esssential Skin Folder is copied from Reallusion/Template/iClone Character Creator 1 Template/Skin/Special

4-9
Confirm the Exported Data [New_Japanese_CC2.0Beta.iAvatar].
5
Attaching the Hair on the iClone6.5.
5-1
Load the New_Asian iAvatar on the iClone 6.5, adjust Light, etc.
 
(iClone 6.5 Pro)
iC6.5_Model
5-2
Attach Komachi-Hair.
 
(iClone 6.5 Pro)
KomachiHair
5-3
At Texture Settings, use Diffuse, bump and Blend on the hair parts.
 
(iClone 6.5 Pro)
TextureSettings
5-4
At iC 6.5, go to Modify/3DXchange and push [Edit in 3DXchange].
 
Editin3DXchange When Clicking the [Edit in Character Creator], CC1.52 will be opened.

Use [Edit in 3DXcahnge] for the CC2.0Beta Import.
5-5
At 3DXchange, go to File/Export to Other 3D Format, and push [Export FBX].
 
3DX_FBXExport
5-6
Confirm that the fbx file and the fbxkey file which have been created automatically.
 
FBXKey .fbxkey file is created in order to authenticate the assets into iClone Character Creator.
5-7
Import the FBX file into CC2.0Beta.
 
CreateAsset
Load the FBX KEY file when importing the FBX character from other 3D tools to ensure the correctness of the shape of the body and the hair.
 
KomachiGami is confirmed as Accessory.
 
(Character Creator 2.0 Beta) KomachiGami is shown in the Scene/Avatar component
KomachiHair_CC2Beta
5-8
Go to Modify/Material/Texture Settings, add Blend image and select Mode [Multiply].
 
(Character Creator 2.0 Beta)
TextureSettings_CC2Beta
5-9
Save the KomachiGami: Under Content/Accessory/Head/Custom and push [+].
 
Saved as [Komachigami.ccAcc] and Not Conformable.
SaveKomachiHair
6
MMYukata Cloth Import Test
6-1
Download the [MMYukataForA3] created by mamomamo.
 
 
MMYukataForA3
copyrights Creator: mamomamo
Yukata

Download Link: Top /My Free Stuff → ClothesAiko3.0
 
MMYukataForA3.zip: File Size:9.42MB
zip

MMYukataForA3/Runtime
Runtime
Path
Contents
Geometries
mamomamo/MMYukataForA3/
MMYukata.obj, MMGeta.obj
Libraries
Character/mamomamo/A3/MMYukataforA3/
MMYukata.cr2, MMYukata.png, MMGeta.cr2, MMGeta.png
Pose/mamomamo/A3/MMYukataforA3/

YukataPink.pz2, YukataPink.png, YukataW.pz2, YukataW.png
GetaB.pz2, GetaB.png, GetaR.pz2, GetaR.png

Props/mamomamo/A3/MMYukataforA3/ Uchiwa.pp2, Uchiwa.png
Textures
mamomamo/A3/MMYukataforA3/ Yukata.jpg, YukataW,jpg, MMGeta.jpg,MMGetaB.jpg, GetaBump.jpg,GetaBBump.jpgUchiwa.jpg
6-2
Open and scale the Yukata on the 3DXchange.
 
Yukata_3
6-3
Select all meshes and apply [Auto Smooth]
 
AutoSmooth
6-4
Apply the same Texture to the each body meshes.
 
Texture
6-5
Create texture for Bump and apply to all meshes (test).
6-6
Go to File/Export and export the Yukata_test.obj.
 
Export
6-7
Open MM Geta.obj (Clogs) on the 3DXchange, add Materials and apply to iCLone 6. (Optional)
 
Need to make the MM Geta for Left and Right.
Geta
6-8
Export Uchiwa(Japanese Paper Fan).obj from Poser and open it on the 3DXchange. Apply to iClone6.
 
Uchiwa

7
Putting the Yukata Cloth on the CC Model
7-1
Export the Model with Komach Hair.

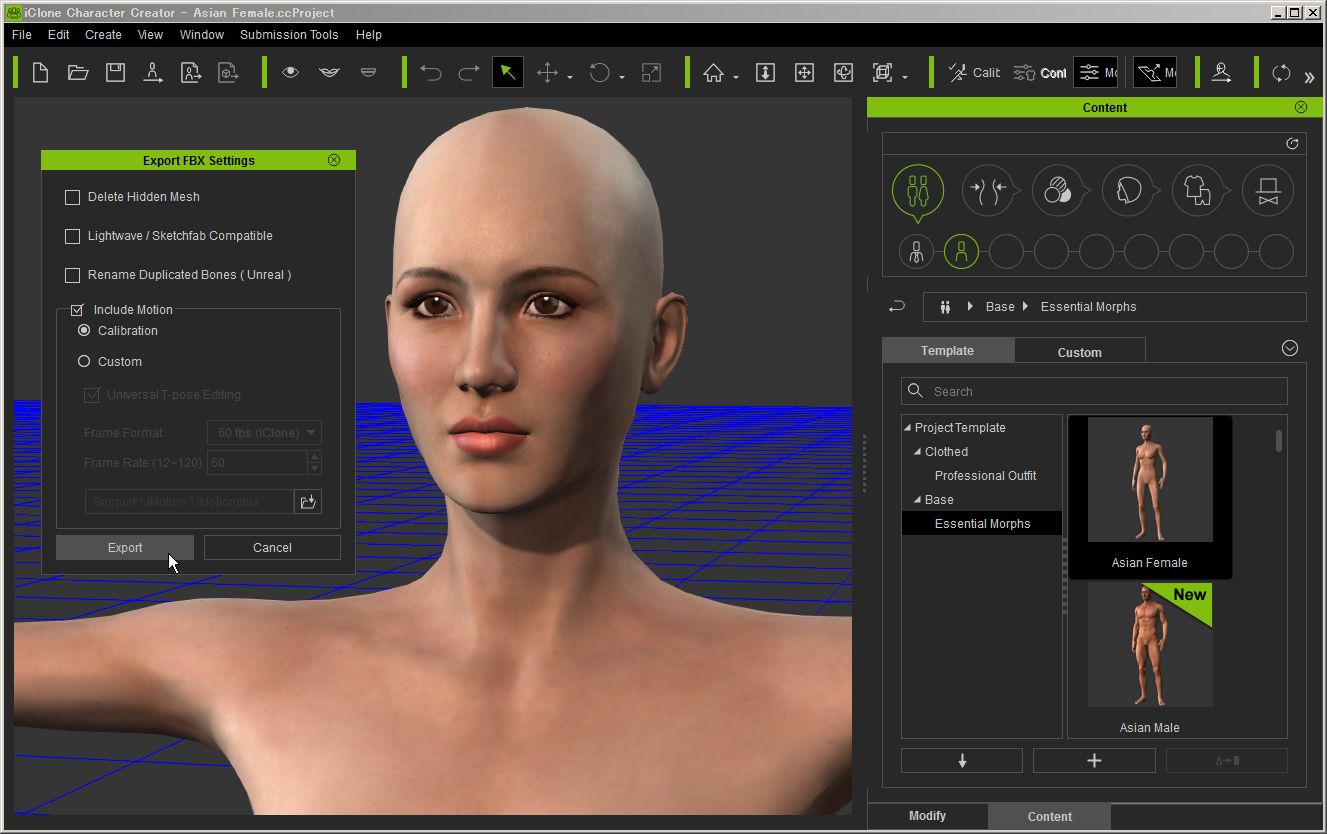
At Export FBX Settings/Include Motion, select [Callibration].
ExportFBX
7-2
Confirm the KomachigamiGirl.fbx and KomachigamiGirl.fbxkey are exported.
 
fbxkey
7-3
Load the Yukata.obj, merge the Model with Komach Hair on the 3D Tool (3ds Max 2016/17).
 
3DTool
7-4
Edit Mesh to deform the cuffs for both forearms.
 
EditMesh_R
7-5
Edit mesh to make the Yokata fit to the body.
 
FitBody
7-6
Select [Skin Wrap] at Modifier List and add the CC_Base_Body to the parameter.
 
Skin-Wrap
7-7
Check the [Weight All Points] and Push [Convert to Skin] button to achieve the Skin.
7-8
Confirm the Skin result on the timeline and correct the incorrect skin influence.
 
PaintWeight
7-9
Move the timeline to change the body posture and confirm the Skin result carefully.
 
Note: Use Alt key to change the paint polarity.
SkinCheck
7-10
Export the Model as Yukata_CCBaseModel.FBX.
8
Importing to CC2.0Beta
8-1
At CC2.0Beta, Go to File/Import and add the fbxkey. Layer Number #3 is added to the Yukata.
 
KomachigamiGirl.fbxkey
OpenPath
AssetImport
8-2
To organize the Material, Go to Material List and work on the following steps.
 

Select all 21 Yukata obj files.
Check on the 2-sided at Material Settings.
Set Specular value to 0.

MaterialSetttings

8-3
Apply Material to the Comb.
 
Accessory
8-4
Apply Callibration pose to observe the Yukata shape and Save the Yukata.
 
Yukata is saved as [Yukata.ccCloth] and Conformable.
SaveYukata
8-5
New Atmosphere: Check the [Sync Sky Image] and rotate the background image.
  Atmosphere
8-6
Atmosphere Templates
  1) Tree Atmosphere templates (hdr format) are available for the IBL Effect Observation.
  IBL
  2) IBL Gizmo Control and Visual Panel
 
Item
Tools
 
Forum
a
Model Contol Alt + Mouth R, L, Wheel    
b
Screen Zoom, Pan, Orbit    
c
Light Control "/"    
d
IBL Gizmo Control Ctrl + "/"
New
e
Visual Panel Sync Sky Image
New
 
IBL Transform
New
 
  3) Toon Shader Template:
 
Toon Shader Template in the iClone/Content Manager/Template/Atmosphere can be applied.
ToonShader
  4) Adding other Atmosphere Image

(Need Investigation)
   
9
Conformable Komachi-Hair
9-1
Conformable Komachi-Hair is possible by skinning it to the CC Base Character (in a 3D Tool).
 
a) Import the Accessory Hair and CC Base body, select all Hair mesh and apply SkinWrap to the CC Base Body.
SkinWrap
b) Skin is finished for Hair mesh.
Skin
c) Skin: Comb
SkinKushi
9-2
Import the Model into CC2.0Beta and select Hair, [Coform] toolbar becomes active
 
ConformActive
9-3
The Hair is saved at Content/Cloth/... as [Cloth.ccCloth] with the proper icon.
9-4
Change the name [Cloth.ccCloth] to [Komachigami.ccCloth].
   
10
Export iAvatar to iClone 6.5
   
  (To be Continued)
   
3DXchange 6 Pipeline Test Series 12 (33)
Dated: 2017.2.10 Hirospot (Hiro Nakazawa)
inserted by FC2 system